React自定义滚动条模块
September 14, 2015
01/29/2016 Update
我基于本文种种,造了一个React插件轮子可以直接使用 React component。
背景
前端开发中很少有人折腾滚动条,一是兼容性问题:Firefox暂时不支持任何形式的滚动条的样式修改;二是必要性:大部分浏览器使用系统默认的滚动条样式,似乎没有必要修改滚动条。但是我最近的一个项目的页面中用了大量的列表(三列),而Mac系统中使用鼠标的情况下,滚动条会默认保持出现,会造成18px左右的空间,跟整体风格非常不搭,因此非常有必要修改下。(下图为三列图,是一个标准的列表形app,滚动条会占用相当大的空间)

思考
Mac系统下使用鼠标和触摸板的滚动条完全不同。使用触摸板时滚动条绝对定位,不使用的时候会自动隐藏,设计非常好。使用鼠标的时候为了方便点击,滚动条始终保持在上,会给使用滚动条的div块占用相当大的一个空间。
一般对于滚动条的修改是使用·-webkit-scrollbar·这个CSS家族进行定义,但是仅限于webkit浏览器。Firefox则完全无法使用。而且,·-webkit-scrollbar·对滚动条进行修改,并不能让滚动条绝对定位,只能改变颜色、宽度和高度等内容。
我的想法是创造一个第三方滚动条,其原理和工作模式与Mac触摸板下的滚动条相同,而且最好打包成一个React模块,方便任何需要滚动的模块使用。
搭建
最后的模块如下,包含一个jsx文件和一个less文件:
使用:
import ScrollView from 'ScrollView.jsx`;
...
render() {
    return (
    <ScrollView>
        {aListThatScrolls}
     </ScrollView>
    );
}
import React from 'react';
import Styles from './ScrollView.less';

export default React.createClass({
    getInitialState() {
        return {
            height: 0,
            handlerScrollTop: 0,
            handlerHide: true
        };
    },

    handlerHider: null,
    scrollHandler: null,
    lastPos: 0,

    componentDidMount() {
        window.addEventListener('resize', this.handleResize);
        document.addEventListener('mousemove', this.handleHandlerMouseMove);
        document.addEventListener('mouseup', this.handleHandlerMouseUp);
        this.updateHeight();
    },

    componentWillUnmount() {
        window.removeEventListener('resize', this.removeResize);
        document.removeEventListener('mousemove', this.handleHandlerMouseMove);
        document.removeEventListener('mouseup', this.handleHandlerMouseUp);
    },
    render() {
        return (
            <div className="ScrollView">
                <div className="scrollbar">
                    <div className={"handler " + (this.state.handlerHide ? 'hide' : '')}
                        style=
                        onMouseDown={this.handleHandlerMouseDown}/>
                </div>
                <div className="scroller" onScroll={this.handleScroll} ref="scroller">
                    {this.props.children}
                </div>
            </div>
        );
    },

    handleScroll(e) {
        clearTimeout(this.handlerHider);
        let pos = e.target.scrollTop / (e.target.scrollHeight- this.state.height) * 0.8;
        this.setState({
            handlerScrollTop: pos * 100,
            handlerHide: false
        }, () => {
            this.handlerHider = setTimeout(() => {
                this.setState({handlerHide: true});
            }, 1500);
        });
        if (pos < 0.2 && pos < this.lastPos && this.props.onApproachingTop) {
            this.props.onApproachingTop();
        }
        if (pos > 0.6 && pos > this.lastPos && this.props.onApproachingBottom) {
            this.props.onApproachingBottom();
        }
        this.lastPos = pos;
    },

    handleResize() {
        this.updateHeight();
    },

    handleHandlerMouseDown(e) {
        this.scrollHandler = e.target;
        clearTimeout(this.handlerHider);
        this.setState({handlerHide: false});
    },

    handleHandlerMouseMove(e) {
        if (this.scrollHandler) {
            let pos = (e.pageY) / this.state.height;
            pos = (pos < 0 ? 0 : (pos > 0.8 ? 0.8 : pos)) * 100;
            React.findDOMNode(this.refs.scroller).scrollTop = pos * React.findDOMNode(this.refs.scroller).scrollHeight / 100;
        }
    },

    handleHandlerMouseUp(e) {
        this.scrollHandler = null;
        clearTimeout(this.handlerHider);
        this.handlerHider = setTimeout(() => {
            this.setState({handlerHide: true});
        }, 1500);
    },

    updateHeight() {
        this.setState({height: React.findDOMNode(this).offsetHeight});
    }

});
@import (reference) "../Base/Base.less";
.ScrollView {
    overflow: hidden;
    height: 100%;
    position: relative;
    .scrollbar {
        position: absolute;
        width: 8px;
        top: 0;
        right: 0;
        height: 100%;
        .handler {
            background-color: rgba(0, 0, 0, 0.5);
            position: absolute;
            width: 6px;
            left: 1px;
            border-radius: 3px;
            z-index: 1;
            .transition(@time: 0.2s, @type: background-color);
            &.hide {
                background-color: rgba(0, 0, 0, 0);
            }
            &:hover {
                background-color: rgba(0, 0, 0, 0.7);
            }
            &:active,
            &:focus {
                cursor: default;
            }
        }
    }
    .scroller {
        overflow-y: auto;
        height: 100%;
        position: absolute;
        top: 0;
        left: 0;
        bottom: 0;
        right: -20px;
        padding-right: 20px;
    }
}
需要注意的几点如下:
- 这个模块的原理并不是彻底消灭滚动条,而是利用
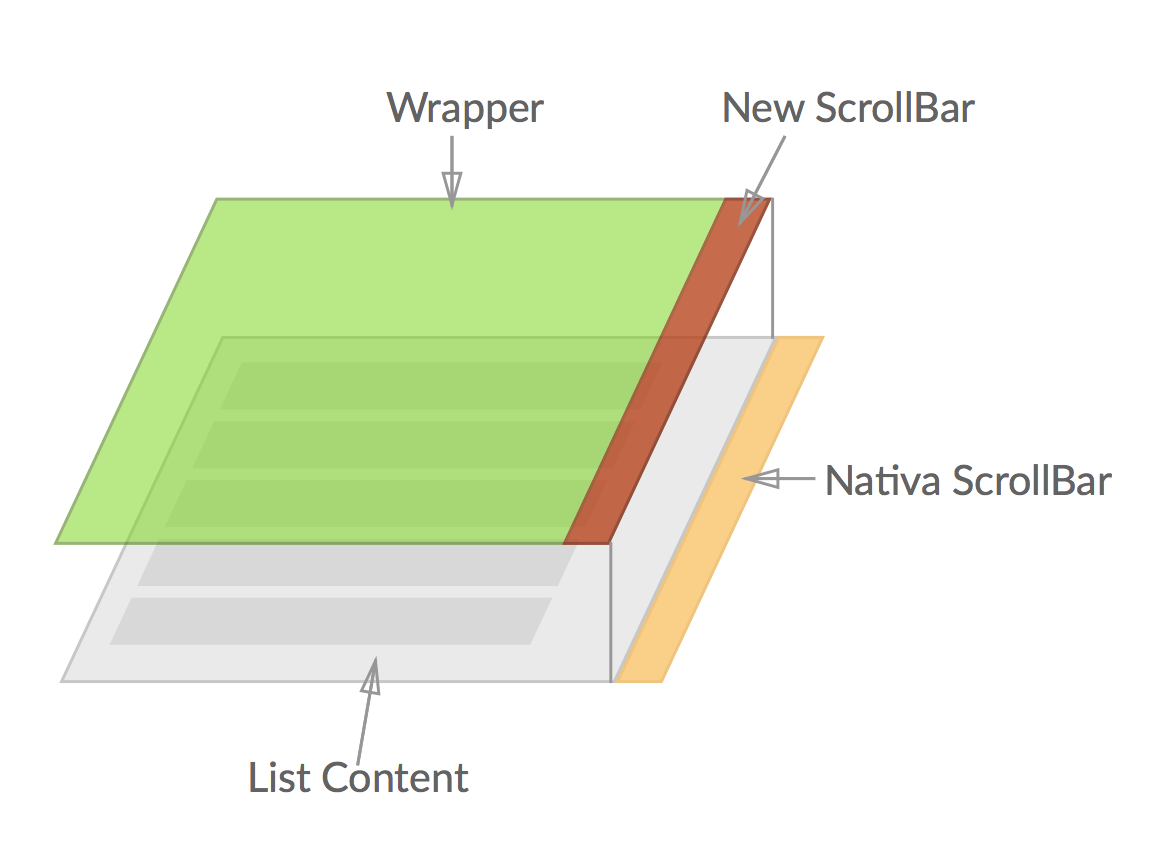
overflow: hidden这个属性把需要滚动的div包裹起来,使滚动的div比wrapper稍微宽一点,然后隐藏右侧的原生滚动条,再在最外层创造一个绝对定位的人工滚动条

- 另外一点则是人工滚动条的高度这里设置为20%,滚动扳手顶部距离页面顶部的最大距离则为80%。为了在滚动的时候计算滚动条的位置,需要利用
let pos = e.target.scrollTop / (e.target.scrollHeight- this.state.height) * 0.8;这个语句来做计算。 - 最后,为了照顾没有滚轮或者触摸板的用户,需要使得滚动条可以点击,这里主要利用了mouseDown, mouseUp和mouseMove等事件。
插件代码 github。 或者安装 $ npm install --save-dev react-free-scrollbar.